If you’ve already taken the time to nail down the perfect navigation for your WordPress site, the next thing on your todo list should be working out how much of your website’s menu should be visible to your site’s visitors.
For many websites, there probably isn’t much need to customize navigation. However, if you happen to run a website with multiple user types and access privileges, menu customization is a must.
Here are some of the reasons you may want to do this:
- You offer members-only access to certain pages, content, and personal profile pages.
- You accept guest posts and want to give them an easy way to log in without having to show a Login button to other visitors.
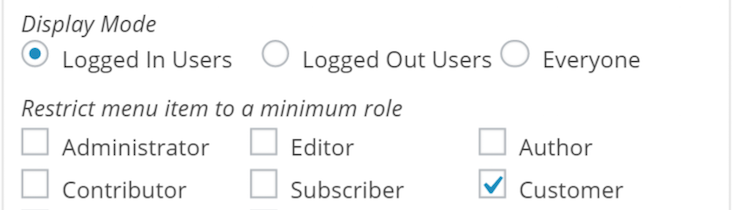
- You have multiple user types that visit your website and you need to restrict access to certain parts of the navigation based on the role they play (i.e. administrator, editor, contributor, customer, etc.)
- You run a forum or other discussion board and want to give logged-in users access to the private discussion area.
- You want to include a registration link only to users who are not logged in or otherwise have access to your website.
If you’re looking for some simple tools and pointers on how to hide or show different parts of your WordPress menu to certain individuals, keep reading.
Plugins to Create WordPress Menus for Specific User Roles
Since plugins will play a crucial role in this process, let’s start there:
Step-by-Step: Creating WordPress Menus for Specific User Roles
Once you’ve selected the plugin you want to use, it’s time to get started in setting up those menu customizations. Refer to the following checklist if you have any questions on how to do this:
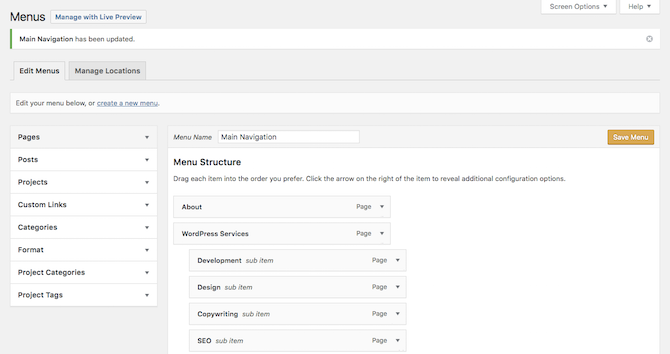
Step 1: In WordPress, go to the Appearance tab and click on Menus. Make sure you’ve set up all of the menus and pages/links you want to include in your site’s navigation.
Remember: you don’t have to create a separate menu for each user role or state, unless you want to. This may make sense if you’re going to present a completely different menu to logged-in users versus logged-out users. However, if you only need to hide a login or register button, or you want to make some other minor change, you’ll be best off just creating one universal menu.
Step 2: Download and activate the plugin you plan to use, if you haven’t done so already.
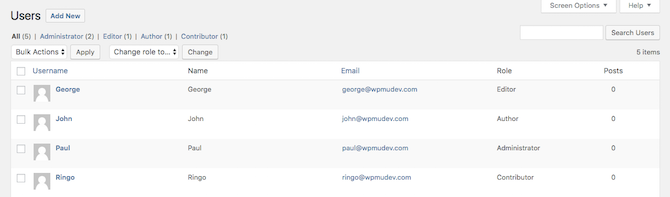
Step 3: Go to the Users tab and click on All Users. Before making any changes to access, ensure that you’ve clearly defined each of your users’ roles within WordPress.
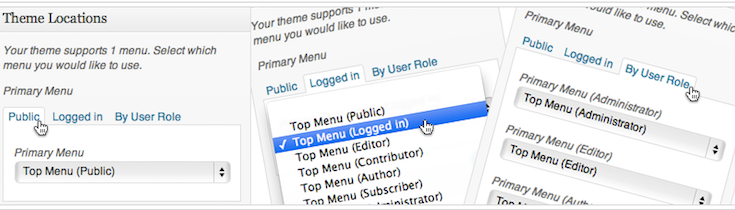
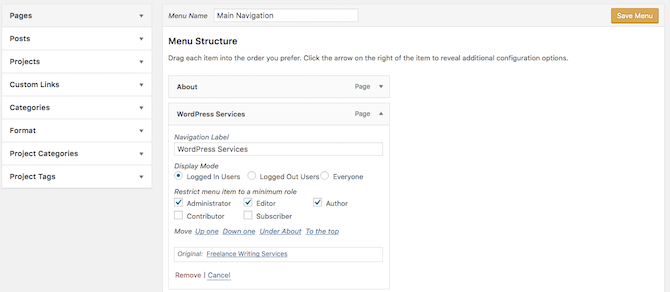
Step 4: Go back to the Menus page. Review each page or link and set the appropriate user restrictions and roles. If you’re using the Menu by User Role plugin, you’ll only need to define which users have access to each menu.
Step 5: Keep in mind that if there are child menu items tucked beneath a page that you plan on hiding from someone, these will also be hidden from view too. So if you don’t want to keep users from accessing those pages, move those child menu pages out onto the top level so they don’t unintentionally get hidden.
Step 6: Once all of these changes have been completed, you’ll want to go through your site to confirm that all the correct links appear.
- Test 1: Visit the site as someone who is logged out or does not have special user access to it otherwise.
- Test 2: Visit the website and log in. Then view how it has changed.
- Test 3: Repeat test #2 for each of the different user roles or conditional restrictions you have put in place.
Once you’ve verified that each user’s menu view is correct, get ready to start inviting others to sign up or join!
Wrapping Up
So there you have it. Six easy-to-use plugins and six simple steps to give you better control over how you create WordPress menus for specific user roles. Not too bad, right?
If you have more than one type of user, why have one-size-fits-all menus? Tailoring menus for each of your users is a must, especially if you run a membership site. First-time visitors to your site don’t necessarily need to see the same content in your sidebars as regular visitors. Likewise, it makes sense to display different information (or widgets) to users who are logged into your site (such as account details), as opposed to users who are logged out.